Is a Picture Worth 1,540.2 Miles?

I’ve been interested in the night sky for several years now.  In those years I’ve bought a telescope, several books, a planisphere , and four apps to go along with all of the camera equipment I already own.  I’ve gotten some decent pictures from nearby and not nearby (mostly National Parks in the West).  The one photo that eluded me was a shot of the Milky Way.  My goal required some planning and some traveling.

To get a photo of the Milky Way you need a very dark, very clear and moonless sky.  We have some dark skies around here, but most are too close to populated areas that produce light pollution.  You need to be out in the middle of nowhere for this to work (if you live in the middle of nowhere, please invite me over for some night photography).  Once you identify an appropriate place, you have to identify the right time.  The moon will drown out many of the stars, so you want the make sure the moon has set or plan your trip during a new moon (consult a lunar calendar).  Next you need to find the Milky Way (use the planisphere).  While we are in the Milky Way and parts are always visible, photographers look for the part near the constellation Scorpius.  This dense part is visible to the south and remains visible most of the night in June and July.  Depending on how dark your sky is, you may see a wispy cloud to a defined group of stars. Remember, the sun sets late in summer and it takes almost two hours after sunset for the sky to get completely dark.  In other words, plan on staying out very late.

Our destination was The Headlands International Dark Sky Park is in Mackinaw City, Michigan.  It is one of ten dark sky parks in this country and one of the closest silver tier parks (all of the gold tier parks are in the West).  Round trip mileage is about 1,100 (the rest of our mileage was from sightseeing in the Upper Peninsula).  The park is small, but wonderful.  The skies are the darkest I’ve seen east of the Mississippi.  In addition, you look out over the Mackinac Straights which are lovely in their own right.  During the day (while you are waiting for sunset), you can take one of the many ferries to Mackinac Island for some wonderful landscape photography or take a tour of one of the many Great Lakes lighthouses.

Astrophotography requires two things: a sturdy tripod and a camera with manual settings.  If you do not have these two things, just lay back and enjoy the stars.  Use the fastest, widest lens that you have. I used a fisheye and a 2.8 24mm lens.  You want to take in as much light as possible.  Use a very high ISO setting to increase the light sensitivity of your camera.  I used settings between 2,000 and 4,500.  Use a remote shutter release to prevent shaking the camera.  Set the shutter to between 20 and 30 seconds, any longer and you will start to see the stars moving in the sky (blurry instead of pinpoints).  Take a lot of photos! We’ll discuss photo stacking and other post-processing methods next time.

So, was it worth all of the miles? You tell me. Go to http://gallery.youreonit.com/stars and leave a comment.

Milky Way From Headlands Park

Baby Shower Bingo

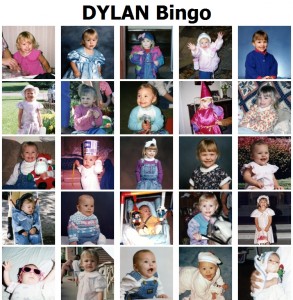
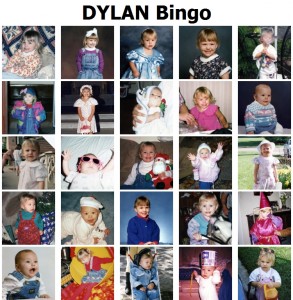
I don’t play shower games.  I avoid them like the plague.  Don’t get me wrong – I’m all for parties and presents for special events. Just hate the standard games that go along with them.  However, I wanted to do something special for my niece (as I am her favorite aunt).  As with many things, my thoughts turned to pictures.  I have many baby photos of her and my original thought was to make a soccer ball shaped centerpiece for her.  That idea failed miserably.  Since her name has 5 letters, I thought of something with Bingo.

I had the general idea of bingo and photos, but it took a little time to work out the details: I would use a standard 5×5 bingo card with pictures instead of numbers.  The mother-to-be would draw pictures of herself from a pile and the players would mark off the square.  For some extra fun, my niece would be challenged to identify each of the pictures (she did pretty well).  The first to get a traditional bingo run (up, down or diagonal) would win.  The winner would, of course, say my niece’s name instead of “bingo.” This last part is optional and does run dangerously close to your average shower game, but I had to give the purists something.

Now the big problem: making the cards.  I needed 30 cards with different photos in different spots (it wouldn’t be a contest if everyone had the same card).  While I could make each by hand, I really didn’t want to.  It was time for an Internet search.  I finally found the program that would generate random cards using pictures; a website I’ve used before – SourceForge.net.  SourceForge.net is a wonderful collection of open source projects that are all available for free download without ads and safe from malware.  BingoCardMaker.SourceForge.net  was developed by a language teacher to generate cards for his students.  It is easy to download and use and allows you to customize your cards completely (you can even include the free space in the middle).  The cardset is generated for you and stored in a folder.  Each card is saved as a different image file and can be viewed before printing (so you don’t waste ink if you need to modify the cards).  I did discover that cropping the photos to a square before I uploaded them made the cards look more like traditional bingo cards. To make the game a bit more interesting, I decided to upload 30 photos and any given card used only 25.

FYI – I still didn’t play.

Bingo Card 04            Bingo Card 01

Bingo Card 02           Bingo Card 03

My Photo Resolutions for 2014

Welcome 2014 – it’s time to get my ducks in a row. My photo ducks, at least.  Here are my five photo-related resolutions for 2014.  I’ll let you know at the end of the year how well I did with them.

Back-up.  Don’t get me wrong, I DO back-up all of my work.  Unfortunately, I usually go overboard and save different versions often in multiple places. Now while this means that I generally don’t lose anything, it also means that it can take me a while to find something (and it uses a lot of space).  So I resolve to back-up my work and delete earlier and working versions when I have completed the project.

Process and delete.  I usually shoot in RAW and shoot more photos than I want to keep.  This means that the files are quite large and many are extra.  To process my photos I need to convert them to JPEGs, delete what I don’t want and make any edits with color or cropping.  Photos can sit on my computer (and back-up) for months before I get to this.  So I resolve to process and delete my photos in a timely manner and then delete the original files.

Share. We learned to share in kindergarten and I’m not, not sharing. I first have to get the files ready (see above resolution) and then second actually do it.  Perhaps the biggest misconception about digital photography is that it makes it easier to share photos.  While this is technically true, I always found that I gave more photos and got more photos when we had them developed.  Towards the end of film it was cheap to have another set of prints made and most people did just that.  So I resolve to burn discs and share them with family and friends no later than one month after the event.

Print.  I haven’t printed photos in years.  Sure, I’ve made many individual photos for frames, but my photo albums are woefully out of date (another casualty of digital).  So I resolve to print or, better yet, create photo books in a timely manner.

Scan.  I have been made the official archivist of my family and as a result have literally boxes of old photos.  I need to get them scanned.  So I resolve to scan, process, share and create photo books of all of my family photos.

I guess I’m going to be fairly busy this year!


Kodak and Metadata

Thanks to Edward Snowden, everyone with a television, radio, Internet connection or newspaper subscription has heard of metadata.  Unfortunately, the innocuous metadata has received a bad rap when really the problem has been the questionable collection and storing of metadata.  Metadata or “data about data” has been around long before the term was coined in the late 60’s.  It may surprise readers to learn that Kodak was involved with data preservation 100 years ago.

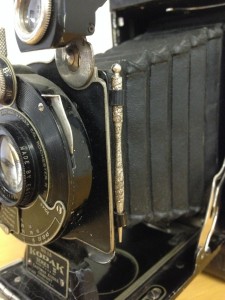
In 1914 Kodak released their line of autographic film and cameras.  The roll film, invented by Henry Jacques Gaisman, had a thin piece of carbon paper backing that allowed the photographer to write a note directly on the film.  This note would be included between the images on the negative and violà, early metadata.  George Eastman saw the potential with the film and bought the invention for $300,000 (over $7 million today).  Kodak advertised it as “the greatest photographic advance in twenty years”.  The autographic cameras came with a metal stylus and a special camera back that included a small door that would be opened to write the note or date.  One year later, Kodak released upgraded camera backs with little doors for existing cameras that would allow them to use the new film (nearly a century before Apple would do the same).  The line was heavily advertised and many cameras with different price points were introduced.  Unfortunately, the idea never took off and the line was discontinued in 1932.  One of the reasons for this still rings true – users kept loosing the stylus!

Not surprisingly, I’ve wanted one of these cameras for my collection and recently got my hands on one.  It’s a 1a Autographic Kodak Series III, circa 1924 which originally sold for $32 (over $400 today) and it’s beautiful!  The bellows are still intact and the shutter still works.  It’s a lovely example of Art Deco design – most importantly – it has the original stylus!

IMG_0349

IMG_0351

IMG_0352

Photoshop and Duct Tape

Photoshop is a wonderful tool that even the great Ansel Adams would have embraced.  But like any tool, it can be used properly or improperly.  With improper use, we run the risk of turning Photoshop into the digital equivalent of duct tape. Sure, duct tape might work, but wouldn’t it look better if it were done properly from the beginning?

Start with a great photo. Photoshop is not an excuse for poor or lazy photography. Get as much straight out of the camera as possible.  Do not rely on the blur tool to create a fake bokeh, learn how to do it by adjusting your aperture. Lighting changes (sources rather than exposure) are particularly difficult to adjust in Photoshop.  Learn photography basics and your camera.

Stay away from making size changes when combining photos. I like to call this “The Anne Geddes Effect”.  Mind you, I have nothing against Ms Geddes. She is a skillful photographer who found a hugely marketable niche.  Unfortunately, many people try to copy her with Photoshop and most do it very badly.  Please keep your butterfly photos and your baby photos separate from each other.  Both are lovely the way they are!

Don’t turn everything into black and white.  Lately I’ve noticed a trend to desaturate every photo in the thought that it makes the photo more dramatic or important.  While certain photos lend themselves to black and white, like some portraits and scenes with high contrast, most should be left with their color in them.  If you do convert a photo, make sure to use all of the Photoshop tools (not just the auto setting) to customize the monochromatic image.

Experiment, but delete it if it’s not up to snuff.  Choose your filters and effects wisely and know when to stop.  Just because they are there doesn’t mean you have to use them.  If it’s not perfect, delete it. Nothing makes a photo look worse than a bad Photoshop job.  Make sure to make your changes to a copy or on another layer so you can return to your original image.

Ansel Adams and Photoshop

Ansel Adams said, “You don’t take a photograph, you make it”.  I’ve always loved that quote, especially in the digital age.  There have always been two elements to film photography:  recording the image and developing the photo.   Adams is the most widely known American photographer because he was a master at both. After scouting his location and waiting for the right conditions to “take” the photograph, he would spend days manipulating a negative to “make” the photograph (all the while taking detailed notes so the print could be precisely duplicated).  He used two tools at his disposal, dodging (lightening) and burning (darkening) perhaps better than anyone.

Dodge and Burn are darkroom methods used to either increase or decrease exposure in a print.  With them you can lighten or darken specific areas to improve tonal quality and contrast or to highlight a certain area to make it a focal point.  These tried and true methods were incorporated in the original version of Photoshop in 1990 and remain in the current toolbars of both CS and Elements (and every other editing program out there).  The Dodge tool is represented by a lollipop-type icon and the Burn tool uses a closed hand as its icon.  Unlike other enhancements in Photoshop which manipulate the entire image, these two tools allow precision changes.  If you have never used them, I strongly urge you to give them a try.  There are more settings than some of the easier tools, but don’t let that throw you.  After you bring in an image, make a duplicate layer to work on.  Both tools allow you to select a brush size, the amount of exposure change (start out with a low number) and the affected range (highlights, midtones or shadows).  Experiment with all settings to see how they work. You’ll soon see their value.

Adams did not live to see digital photography or Photoshop, but I think he would have embraced them. While not an excuse to be a lazy photographer (more about that next time), Photoshop’s tools are a mean to an end. That end, of course, is making a better photograph.

The face in the first photo is overexposed, see how the dodge tool improved it.

melanie_04    melanie_04a


10 Ways To Be Photogenic

Does the camera really add 10 pounds? Well … yes and no.  Unflattering lighting, lens issues and bad angles combined with the inherent problems of transferring a 3D object to a 2D medium can lead to some pretty awful photos.  The other problem is that a photo is not what we see in the mirror, it’s what the mirror sees (the aptly named mirror image). This is why we are often harder on photos of ourselves than of others.  So what can we do about it? Remember, there are two players in any photograph – the subject and the photographer and both can work together to improve a photo.

Rules for the Subject:

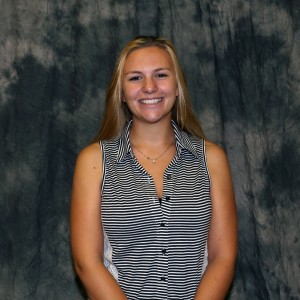
#1 – Don’t sabotage the photo. You hate to have your picture taken and it shows.  You offer up what you know to be a weak smile or stupid look and then remark – “See, I told you I take awful pictures!” Please stop doing this and just let me take the photo.

JD4A3221

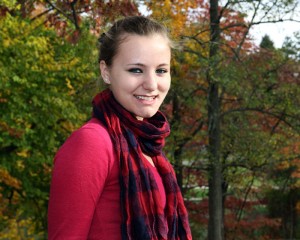
#2 – Spend some time at the mirror. Since no one is perfectly symmetric, one side of your face looks better than the other. Determine which your “best” is (remember right and left are reversed in a mirror). Turn your face and see at what point you look your best (a ¾ view is flattering for most people). Work on your “picture smile” in front of the mirror. This may seem like the height of narcissism, but you will look better in photos.

#3 – Hide what you don’t like. A strategically placed bag, arm, couch pillow or child can go a long way. Just make sure that you don’t look like your hiding. If you don’t like the way your teeth look in photos, perfect a pleasant toothless smile.

#4 – Strike a pose. Have you ever liked a photo of yourself that it taken square-on with your arms flat at your sides? Probably not, so try these moves: Turn slightly away so you are not square-on, move one foot in front of you pointed at the camera and rest your weight on your back foot.  Shoulders back, chest out and stomach muscles tight (but don’t look like a soldier at attention). Move your arms slightly away from your body and bend them gently and relax your hands.  Force your face forward just a bit (this will feel very unnatural, but it will avoid a double chin). Add that smile from the mirror and – bingo – we have a good photo.

JD4A3225JD4A3226

#5 – Look your best. With cell phones it is arguable that every day is “picture day”; however there are times when you know there will be a camera around. On those days (think holidays and weddings), be sure to wear an outfit that flatters you or at least avoid what you know doesn’t work for you. For women – keep the shine away, moisturize and at least wear mascara (this is so much more important as we age).

Rules for the Photographer:

#1 – Watch the lighting and your angles. Avoid the midday sun, it will leave harsh shadows. If you have no option, get into the shade or use your flash to get rid of the shadows.  Never shoot people from below. Granted, they may look taller but the other distortions will not be appreciated. Shooting from eye-level or slightly above is your goal. Take a step or two back and zoom in a bit to fill the frame. If you are too close with your camera on wide, it will distort their faces.

JD4A3229

#2 – Try to get candid shots. Many people freeze when they see a camera; try to catch them unaware. Most of my favorite photos are stealth ones.

#3 – Gather people close together. Photos always look better when the subjects are close to each other, but avoid the line-up. Also, keep an eye on the background and avoid the clutter.

JD4A3251JD4A3230

#4 – Delete awful photos. You are bound to take some terrible photos now and again.  Please use that delete button and in the name of all that is holy – DO NOT POST THEM ON FACEBOOK!

#5 – Edit a little. If you are familiar with an editing program, make a few minor adjustments.  Just keep the changes very subtle. An over-edited picture usually looks worse than the original.

Photographing Fireworks

fireworks at cliff's

It’s almost time for fireworks again! Fireworks are always a popular subject; here are some tips for better photos:

  • Cameras with full manual ability and a sturdy tripod are required.  If you do not have both, just sit back and enjoy the show.  Feel free to have fun with your phone, but don’t plan on making the photos any larger than your phone screen (they will not be clear enough).
  • Location is everything!  Find a vantage point with an unobstructed view of the area that is upwind.  Often, this will be away from the crowd.  Check your view for errant light like street lamps.  Fill the frame with the burst (using a zoom) or pull back to include water, buildings and bridges.   Don’t forget to photograph the spectators’ faces.  A silhouetted crowd or structure is also a good shot.
  • Plan on using all of the memory and battery power that you have.  You will take MANY photos and will not have time to delete during the show.  Be sure to keep enough in reserve for the finale.
  • Settings – aperture f/8 or f/11, ISO 100, manual focus to infinity, no flash. Let me repeat – no flash! It will not improve your photo and WILL annoy the person next to you.
  • Shutter speed will make or break you.  Experiment with the shutter open from 2 seconds to 30 seconds.  In general, a professional show will require a shorter shutter speed than a backyard show (professional grade fireworks are bigger and brighter).  A small device called a shutter release is worth its weight in gold.  It holds the shutter open with one click and closes it with the next.  You’ll have complete control over the shutter and won’t need to touch (and perhaps shake) the camera. With this, you can keep the shutter open for several minutes and capture multiple bursts.  Check the manual to see if your camera accepts one.
  • As with all fast-action photography, you have to shoot before it happens.  Open the shutter when you hear to explosion and close it when the light trails start to disappear (somewhere between the oohs and the ahhs).
  • Don’t get so absorbed with the photography that you forget to watch the show!

Send in your best fireworks photos to share!  Email your jpeg to me (cindy@YoureOnIt.com) and I’ll post them on my Facebook page.

You Press the Button …

kodak

In 1888, George Eastman introduced the Kodak camera and for the first time, photographs could be taken by amateurs.  His original advertising slogan “You press the button, we do the rest” was not only catchy, it was completely accurate.  Indeed, there was very little this new breed of photographers could do other than press the shutter and advance the film by turning a key.  This included looking through a viewfinder; the original Kodak did not have one (but it did provide a guide to give you an idea of the coverage area). To take a photo, one would hold the camera at waist level, slightly against the abdomen for steadiness and click.  The camera was loaded with enough film for 100 photos (assuming that you did not overwind).  At the end of a roll, you sent the camera back to have the 2 ½ “ round photos developed and the camera reloaded with film.

Despite the $25 price tag (a hefty amount in 1888), the Kodak was a success. President Grover Cleveland owned one, although he reportedly did not advance the film on his first try and took 100 photos on one exposure!  The Kodak camera was also making an impact on society. In comments that echo the concerns of today’s online postings, The Hartford Courant lamented the fact that an average person cannot “indulge in any hilariousness” without the fear of photos surfacing in his Sunday school class.

Eastman realized the limitations of a $25 camera and in 1900 introduced the first Brownie camera.  Its cardboard frame and simple lens lowered the cost to an affordable $1 (plus 15¢ for film).  Snapshot photography was born and the Brownie camera line remained popular until its end in 1970.  Many photographers, including Ansel Adams, recall that a Brownie was their first camera. Adams received his from his parents on his first trip to Yosemite.

Over the years, Kodak has released 100’s of different cameras and models ranging from the über-popular (the Instamatic and the Pocket Instamatic) to the never should have been made (the Disc cameras). The Eastman Kodak Co. is expected to emerge from bankruptcy protection this summer.  It will not be the company it once was and probably will not sell cameras or film (it has already sold many of its patents).  It may even go the way of Polaroid and become only an administrative shell with a famous name.  Of course, this would be a shame, but what a name! Few companies have lasted as long and have had the impact of Kodak.  Ironically, the company responsible for adding “A Kodak Moment” to the lexicon did not realize that they were really selling memories, not film, cameras or printers.

Tips for Choosing a Wedding Photographer

your21

Did you get engaged this Christmas or Valentine’s Day? Congratulations!  One of the many decisions you’ll need to make is which photographer to hire.  Since you’ll have the pictures long after the last piece of cake is eaten, it’s an important decision.  Here are some tips that could help you decide:

Plan to hire someone.  With digital cameras it is tempting to think that you can just collect photos from all of your friends.  Even if you are able to collect the photos (collecting photos from people is harder than it should be); it is unlikely that they will measure up to professional photos.  Your guests will probably not possess the skills or the equipment necessary for high quality shots.  The photographer also has another role – to make sure that all of the “must-have” photos are taken.   Photos from your guests are a wonderful gift, but not a replacement.

Get names.  Ask your friends, family and other wedding professionals for recommendations.   Personal references are usually quite helpful; combine them with online searches to cover your bases.

Check out their websites.  Every photographer has one (beware if they don’t) and there should be plenty of samples.  You might also be able to get an idea of the photographer’s personality from his or her website.

Attend bridal shows.  True, photographers are there to sell; but you can see samples from several in one location and meet the photographers (and other vendors).

Consider the photographer’s personality.  This is someone that you will be spending a lot of time with.  Do you get the sense that he or she truly enjoys weddings? Is it someone that you like?  Do your personalities match or complement each other?  Can this person remain polite to all of the guests, all day long?

Does it matter to you if your photographer is a man or a woman?  Most weddings include a fair number of “getting- ready” photos.  Will the bride be comfortable with a man taking these photos?

What is included in the photo package?  Will you get full resolution files of your photos, or just proofs?  What about copyright permission? Make sure that the contract states everything clearly including a timeline and emergency policies.

Check into the extras.  Is there an Online Gallery where family and friends can view and/or purchase photos?  Is the photographer an experienced editor that can Photoshop where needed?  Will the photographer help you choose the photos for your album or are you on your own?  Keep all of this in mind when comparing costs. Make sure that you are comparing photo packages with similar features.